PROJECT - Making a Box with a Curved Lid
About the course
If you have any sort of urge to move on from straight lines and get a few curves into your woodworking designs, LAMINATING is going to be the vital technique that you will need to master.
In essence, laminating is a pretty simple concept, after all it’s just combining thin bits of wood with glue and holding them in the desired shape until the glue has set. As with most simple things though, there are tricks and techniques that will give you a head start and guarantee success.
MOULDS & LAMINATES
Moulds for curved work can be made in many different ways and after many years of creating curvaceous pieces of furniture we have quick and fool-proof solutions for ‘in-house’ mould making. What should you use for your laminates? Constructional veneer, Flexible Plywood, Laminates cut from the solid on a band-saw? It’s important the you get the choice of material correct, this will vary depending on what you’re making, a door, a drawer front, a box lid…… so we’ll look at the options and the pros and cons so that you can make an informed choice about what’s most appropriate for a particular project.
EQUIPMENT
Inevitably there are some specialist tools and pieces of equipment that will make the process of laminating easier and we will look at low tech solutions which might involve lots of MDF and many cramps. Every time I use a Vacuum Press I think it must surely be something to do with the dark arts, it’s certainly as close as any woodworker’s going to get to a magic trick. This is an incredibly simple system and perfect for the small workshop, no need for huge hydraulic presses, just a small box of bits a bag and a pump. You’ll be amazed at what a Vacuum Press can do, it can certainly be a real game changer, we’ll look at how to set up and use this amazing piece of kit for creating curves and look at the other things it can do for you. We’ll also look at some other systems for persuading flat things to become a little more voluptuous.
GLUES
Laminating is all about sticking things together so it’s vital that you pick the right glue. Different glues have different properties, we’ll look at the glues that are available at the moment, some old favourites and some new innovations. Which are the best behaved glues for laminating work and we’ll look at all the technical stuff like shelf-life, open-times, press times, mixing ratios, solvents…. Just choosing the right glue can be the difference between a pleasant, successful experience and a nasty sticky nightmare. Surprises can often be nice things, but when making laminated components reliable predictability is really what we need.
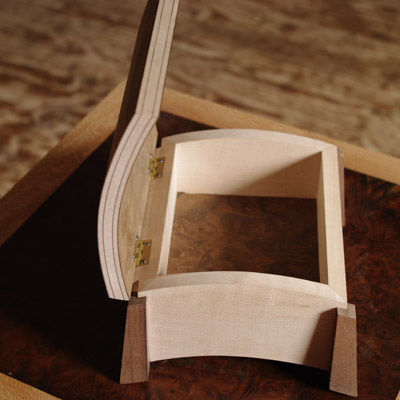
BOX PROJECT
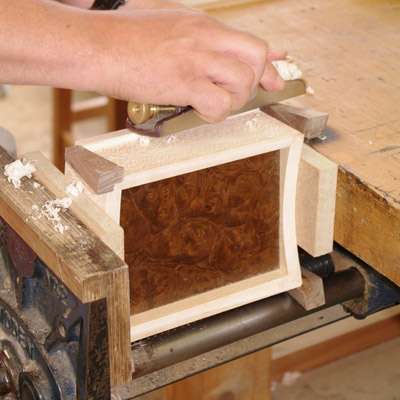
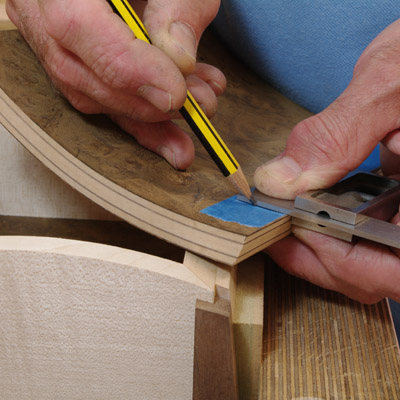
Having made friends with the various processes, creating a couple of curvaceous test pieces, it will be time to try out your new skills by making a small box. This project will be a chance to practice some woodworking skills too; preparing some nice, accurate, flat components, there will be techniques and jigs, including a ‘Donkey’s Ear’, for cutting crisp mitre joints by hand, letting in some hinges and, of course, laminating, veneering and fitting a curved lid.
What You Will Learn
LAMINATES – how to choose laminate materials for a particular project
GLUES – types, properties, solvents……
MOULDS – types, materials and techniques for accurate home-made moulds
EQUIPMENT – Tools, cramps, routers… used for making moulds and laminating
VACUUM PRESS – options, types, bags – tried and tested methods for using this cunning piece of equipment in a smaller workshop.
VENEERING – adding veneer to a curved surface using a vacuum press and traditional techniques
CABINETMAKING SKILLS – accurately preparing components, hand-cutting mitres, using shooting boards and jigs, cutting grooves, letting in and fitting hinges
Skill Level : Beginner / Intermediate
Cost : £480
Duration : 3 Days
Project: Make a box with a curvaceous lid
Other : Ideally some prior knowledge of woodwork is preferable but not essential
Dates :
3-5 May 2025 Bank holiday


Read what our recent students say about this course
“The content, I have used some of the tools used, but not have the knowledge of how to use them, the planes were of special interest as I have a couple of rubbish one’s & now knowing what they can do in trained hands is great! I am looking to get a couple & a bag press etc. The brew breaks, tasty biscuits & a special thanks for the flapjacks from the catering dept!! Very nice. A nice place to work & learn, & special thanks to John, for his meticulous attention to detail. A very nice certificate, thank-you.”
“It had a relaxed atmosphere; everyone was kind and willing to help;everything was fully explained; breaks were frequent and a suitable length.”
“I learnt a lot. All the tools were neatly hung on the wall, very sharp and in perfect working order. I felt quite at ease to ask questions and go at my own pace.”
“Just very good to work with John who has so much knowledge of tool set up and wood craftsmanship”
“John’s teaching is clear and methodical and he is very patient answering queries. I learnt so much – about tools, wood and techniques.”
“Course had a good pace and we were busy all the time and it was a good student / teacher ratio. All tools provided were good quality and sharp and the teaching was excellent.”
“Learning from an expert, everything clearly explained, felt you could ask any question, small group, homemade cookies and treats!”
“John has a good way of dealing with a multi-skilled group. I am a beginner and he never made me feel inadequate. He has a very nice teaching style and was good company.”
© 2026 · John Lloyd Furniture & John Lloyd Furniture School