PROJECT - Making a Bar Stool
About the course
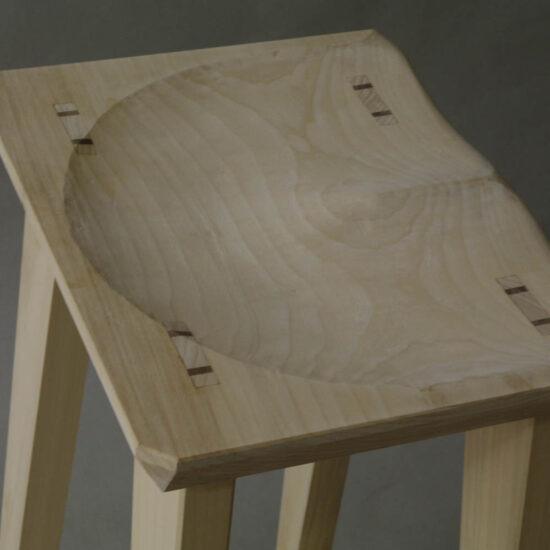
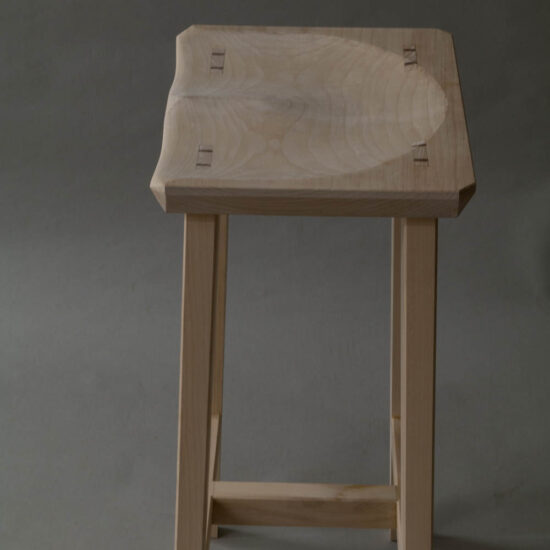
A shaped, or ‘bottomed’ seat, as I like to call it, isn’t just a really comfortable thing to sit on, it’s really fun to make. Add to this some elegant tapered legs, various mortice and tenon joints, with wedges & pegs, dovetailed stretcher joints and a bit of shaping, and you will have a comfortable, stylish stool that people will be fighting to sit on. The only problem might be that when you’ve made one, you’ll probably find that you will be required to make several more.
This stool design is based loosely on a Danish stool that I sat on to drink coffee in Copenhagen, a great place to visit if you want some furniture based inspiration. Made in Poplar, throughout, you will get the chance to practice some accurate setting out, hand and machine-cut joints, including the enduring, but slightly tricky, through Mortice & Tenon, and some dovetails for the ‘H’ stretcher . You will then be able to let your hair down a bit with some freestyle ‘Saddling’ or ‘Bottoming’ with a ‘Travisher’, which sounds a bit dodgy, unless you’re referring to items of hand-shaped wooden seating, using a traditional woodworking tool, similar in many ways to a spokeshave, which we are!
What You Will Learn
HOW TO MAKE AND USE A COMPREHENSIVE SET OF JIGS & HAND-MADE TOOLS INCLUDING:
- DESIGN – The design process, including: Joint selection; Coping with wood movement and Structural stability
- MARKING COMPONENTS – the annoyingly clever Continental method of keeping components under control and all facing in the right direction
- SETTING OUT JOINTS – Accurate setting out is vital for resilient joints
- CUTTING MORTICE & TENON JOINTS – Cutting this enduring, but rather tricky joint using a combination of hand tools and machines
- CUTTING TAPERS – For the elegant legs
- DRAW-BORING & PEG MAKING – Setting out and drilling Mortice & Tenon joints for draw-bored, pegged joints. This is another traditional technique, used extensively on Oak Framed buildings, which is an extremely effective way of pulling a joint together without the need for clamps
- MODERN JOINT-CUTTING POWER TOOLS – setting up and using the Festool DOMINO machine
- SHAPING A SEAT with a TRAVISHER – Marking out the shape and depth of a ‘Bottomed’ seat. Using a Travisher to cut the top surface of the curvaceous seat, this is a very traditional tool, similar in many ways to a spokeshave, but used with a great deal more vigour and much less restraint. This is quite a freestyle process, unlike just about any other cabinetmaking technique, and can be a pretty good upper-body workout.
- CABINET-SCRAPER – A quick refresher on how to sharpen and use this versatile, but very simple, shaping and finishing tool
- GLUING – glue choice and strategies for stress-free glue –ups.
- FINISHING – Preparing wood for a finish. A simple technique for applying a shellac and wax finish to bring out the beauty of the wood and give your bar-stool a little protection from high-spirited occupants.
Skill Level : Novice+/ Intermediate
Ideally students will have taken the SKILLS WEEK or Cabinetmaking Fundamentals or have similar experience
Cost : £850 (2026: £890)
Duration : 5 Days
Test Piece : A bar stool with shaped seat and tapered legs
Other : All tools & materials will be provided
Dates :
27 -31 August 2025
24-28 August 2026


Read what our recent students say about this course
This is a new course for 2020 so no reviews yet!
© 2026 · John Lloyd Furniture & John Lloyd Furniture School
